![]()
![]()
![]()
![]()
![]()
The
Basics - Part 2
Return
to Part 1 Advance to Part
3
|
|
| Creating a Communicator |
| Described below are the sources and/or processes by which Wah Chang must have made his comm props, broken down into the various components. Most likely he did all the tasks by himself, but possible assistance from his former Project Unlimited staff can't be ruled out. Often it is noted that Star Trek was a show done on the cheap, and that everything, props included, was fashioned to be just good enough to get by. And yet here in Wah's work we see amazing attention given to some details - but then lackluster craftsmanship in others. It is a dichotomy we attempt where possible to explore, believing as we do that behind most every choice is a reason...
|
| Creating a Communicator... The Outside |
|
Shells (<<
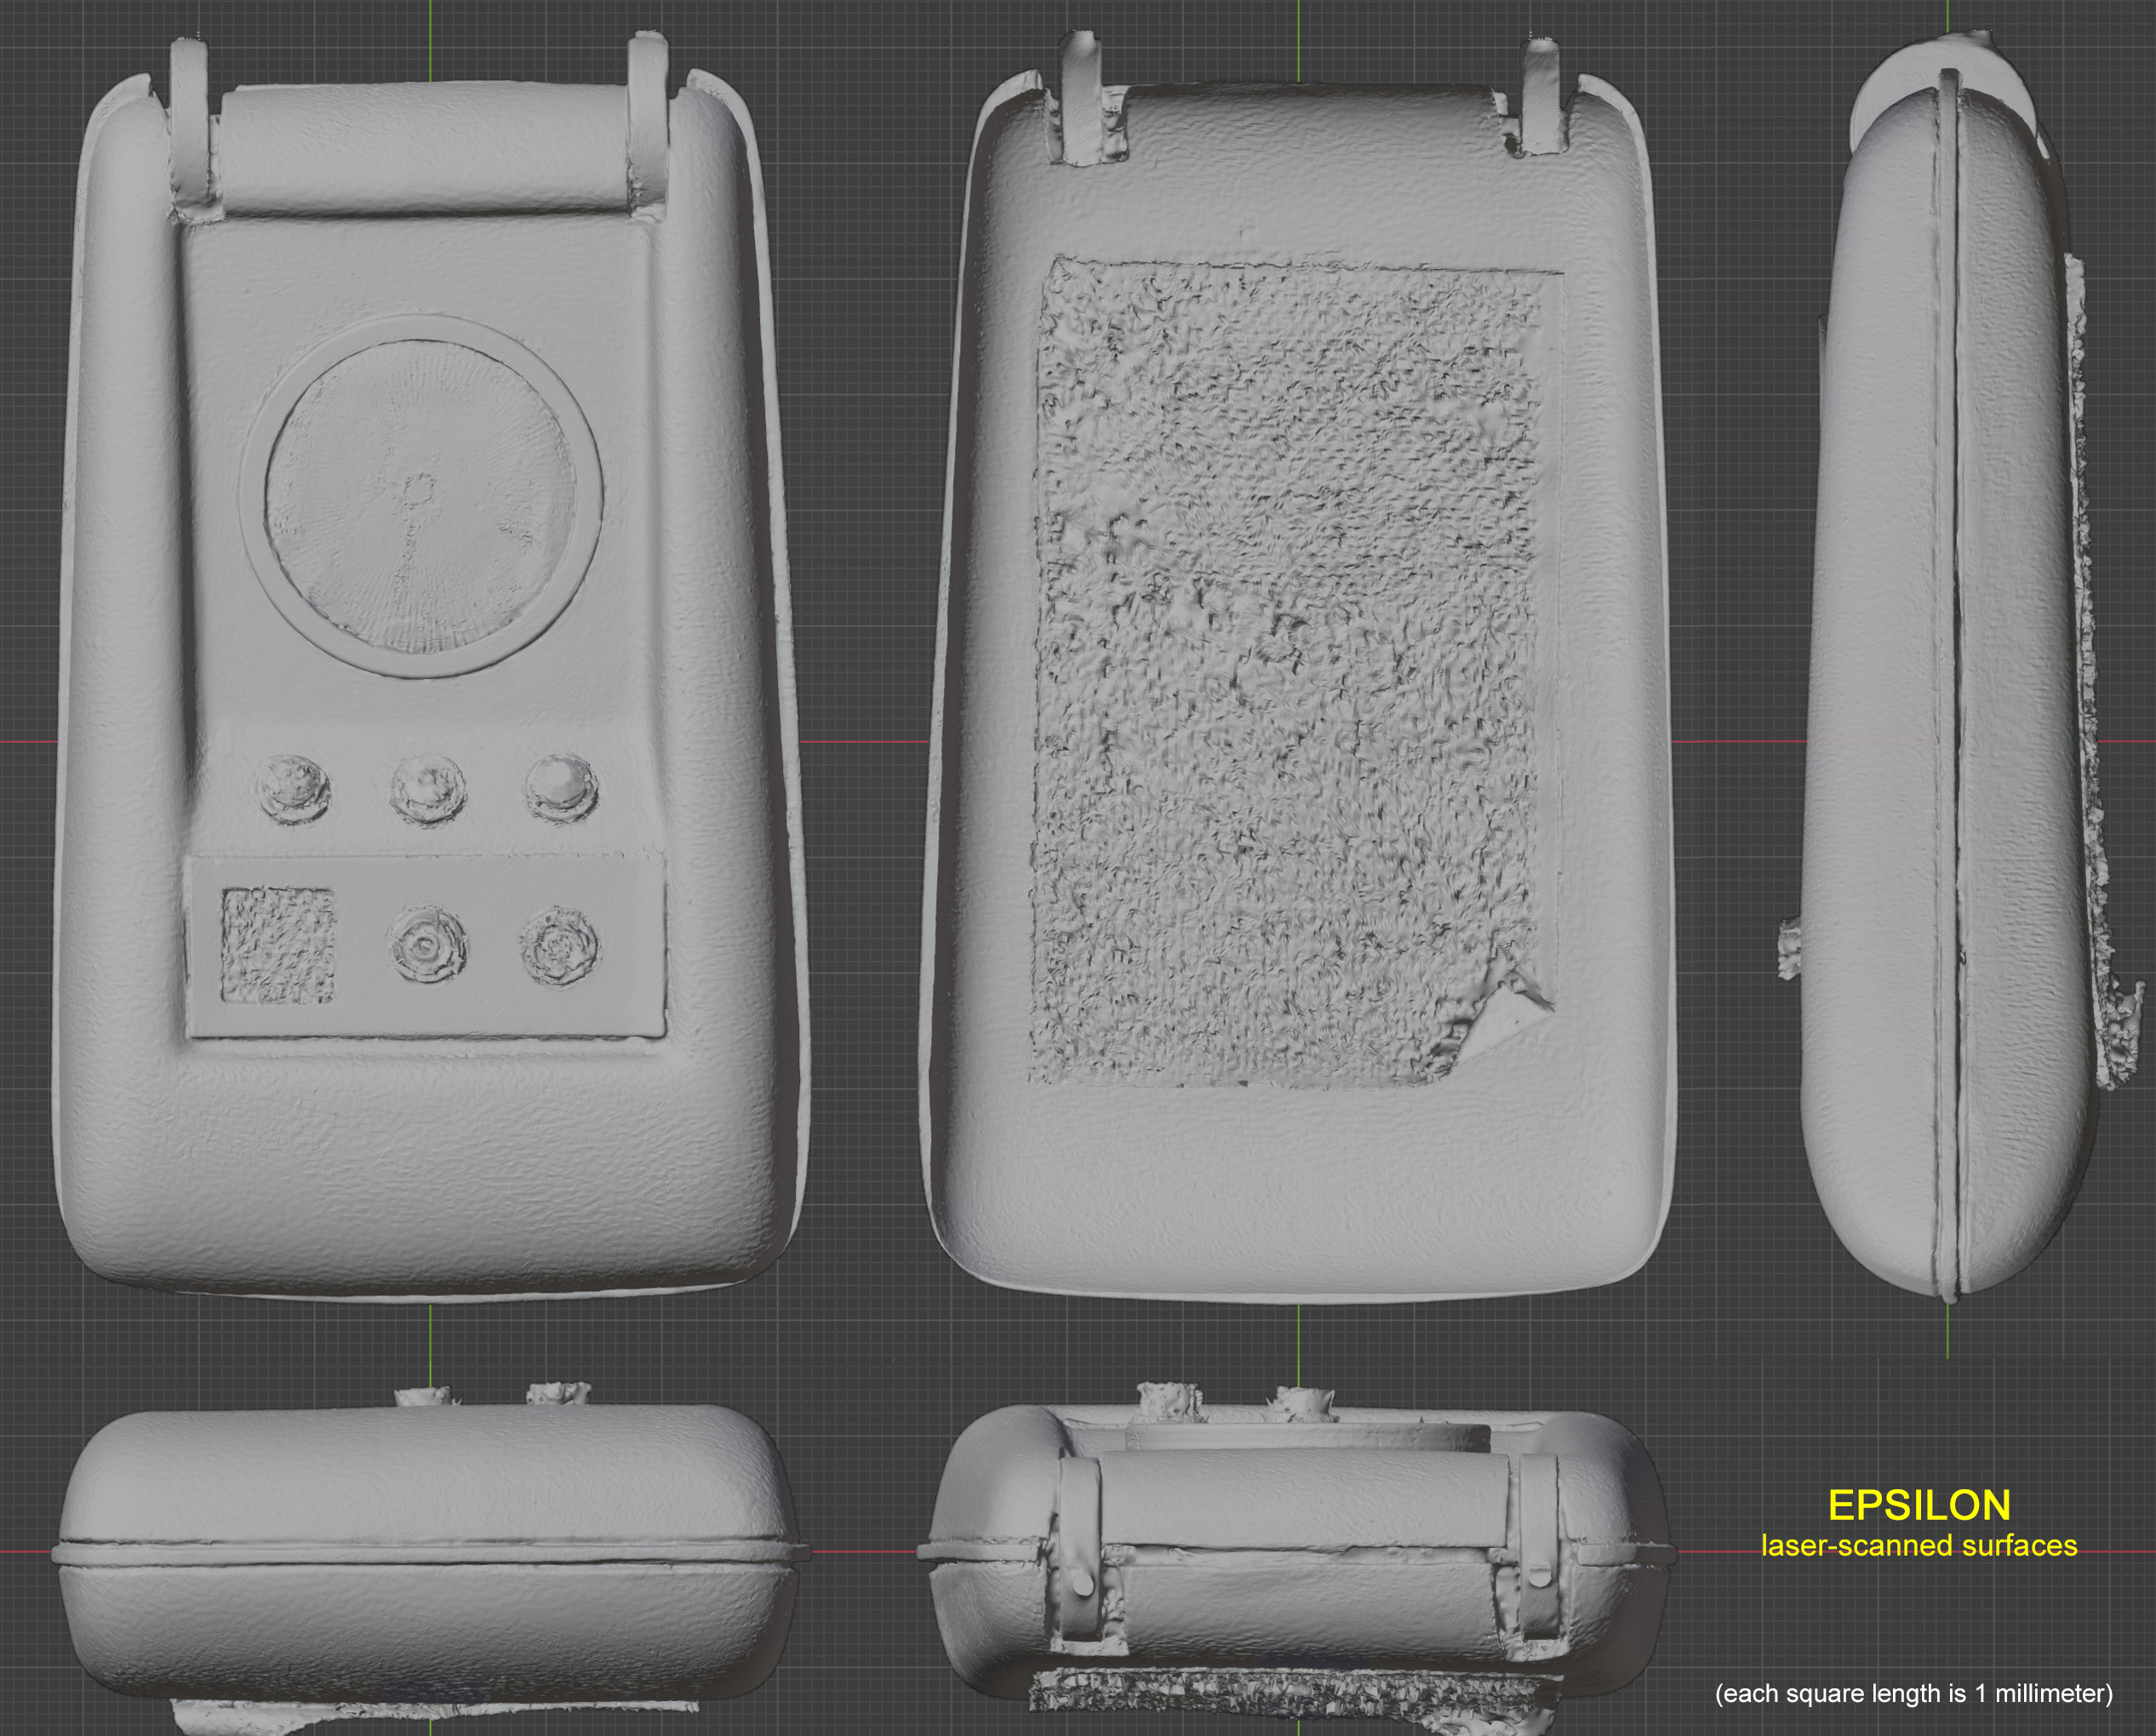
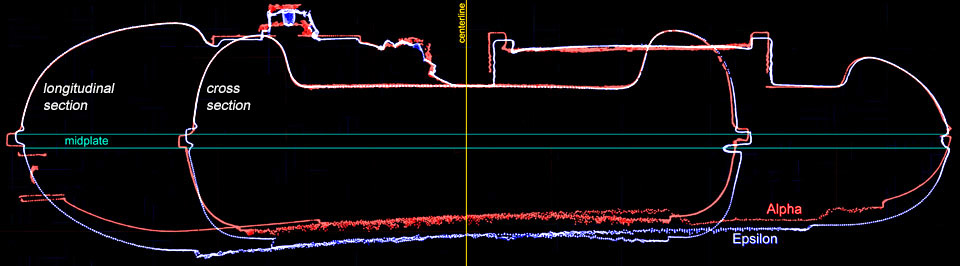
link to detailed "Parts" page) HC note - we have not performed a chemical assay to determine if the shells are actually Kydex or any other plastic, such as ABS (also available in 1966). Past experts have unequivocally called it as Kydex, and to be sure it has that plastic's distinct appearance and feel. As such, we have no reason at this time to say otherwise. Myth: The bucks were hand carved by Wah out of clay or wood. Truth: False. Partial circle imprints in the inside of the bottom shells are precisely sized and located where circular "feet" on the Sterling pencil box also appear. Plus each and every odd zigzag in the control well's edges (callled here "wanks" - and, yes, our British friends, we know what that means there) that had defied explanation for decades can be perfectly recreated by simply assembling the cut-up pieces of the box just as Wah did. More on this here. It was reported that Wah's recollection later in his life was that he did not perform the actual vacuforming; that he farmed that specific task out. While it is true that he did remember some other details of his early work incorrectly, the specialized equipment, plastic stock and skills required for vacuforming are not common in your average craftsman's shop, thus this occurrence is likely factual. Every bit of evidence shows that the Kydex's faint "haircell" texture runs left-right in each and every shell. Myth: Some shells were glossy smooth instead of textured. Truth: There is no evidence that any were smooth. In fact HD screen caps prove in most and strongly suggest in the rest that all had the same light haircell. The origin of this myth is likely from earlier low resolution pics, which didn't pick up well the subtle texture. When filmed outdoors, the sky's expansive brightness could even create the illusion of a glossy shine on the comm when the images are at standard DVD size. Now while it is true that the Kydex sheets were textured on one side and smooth on the other, it seems Wah (or the shop that vacuformed for him) was fully consistent with the orientation. This subject is discussed at greater length and with photographs on this page. Myth: The Kydex used was dark grey. Truth: Nope. All were black, probably the only color offered in Kydex's first two years of availability. The shell shape, with an average maximum length./.width of 4.10" x 2.48" - close to the Golden Ratio of 1.618 - is quite complicated, as there is barely a set of straight or parallel lines in the whole thing. Nearly everything rounds and tapers, as you can see in these 3D laser scans (courtesy of The Wand Company):
Click on each for a high-rez, printable-to-scale version. And here's some sections from those scans (the Velcro on the back makes much of the bottom "fuzzy"):
Since the total height (and thus length & width too) was determined by how much each shell half was sanded down, they all vary a little, but assembled with the mid-plate, the maximum heights of the comm bodies (minus antenna) range between 0.93" and 1.01". While the top shells seem to have been cut down to a mostly consistent height, the bottom shells vary substantially in how deeply they were trimmed; those five attached by screws are all thinner so the small 1/2" screws could manage to reach the metal midplate. At some point in the midst of his vacuforming, he added to the bottom buck the four recessed dimples for the screws, so six have these recessed holes and four do not. The top buck also ended up with a crack in it in the upper well area, as it was likely snapped in two during the vacuforming process and was patched up. Myth: Wah painted all the shells with a black paint before final assembly. Truth: No trace of evidence exists to support this notion, put forward by one prop builder. After more than four decades of heavy surface abuse, you would expect to see uneven wear, chips, or scratches reveal clues of a substrate overlaid with enamel. None of this is seen. Myth: Only the two hero communicators had the short midplate length in the back between the hinge wheels. Truth: At least six comms (Alpha, Beta, Gamma, Delta, Iota and Kappa) are seen with this mid-wheel midplate at some point during filming:
We think it likely all ten comms originally had this short piece upon delivery to the studio, but some obviously fell out quickly and were never replaced.
The antenna (with 2.90" x 1.64" average outside dimensions) when being opened can be seen both stopping at a less than 180 degrees and less commonly swinging freely beyond to a point were the back edge of the antenna hits the underside of the shell. A small pin was inserted into the inward surface of the right hinge disc to act as a stop when it hit the inside of the top shell. In some, this pin fell out, though in Gamma (see below right) and Iota, the pin was later put back in.
Those bottom shells with screws also have four indentations (or "dimples") in the plastic shell for the screws to recess into. Four comms, however (Epsilon, Theta, Eta and Iota), came with no screws or indentations. Both shell halves are obviously glued to the midplate. And one is an odd mix; Delta has the indentations in the bottom but no screws - nor are the holes even drilled through the Kydex.
It's not known whether Wah himself or the Desilu prop or costume shop applied the Velcro, but our hunch is that the studio did. |
| Creating a Communicator... The Inside |
|
Control
Panel (Panel, Mic
Grill, & Knobs) Myth: The radio Wah used was a Universal 8 Transistor. Truth: No. It was likely a Coronet 2-Transistor Boys radio, pictured on the right >>. This was determined by discovering the mesh used by Wah had a rare diamond-to-hole spacing seen only in a small percentage of predominantly just this one brand. More reading on this is on the "Mic Grill" Parts page linked above. Myth: Some of the speaker mesh used in the mic grill was colorless (platinum), not gold. Truth: Not so. We've known for decades that most have the light gold colored material, but did all? Now to be sure, in some shots some do seem to look silver. However, the gold is pale enough so that where the color is washed out even slightly, it can look colorless. For instance in Alpha, that same silver under different lighting tells a different story...
The control knobs were chromed plastic slot race car wheel hubs originally from Aurora's "Vibrator" series that were glued in place. At least four distinct versions of these hubs were made for "Vibe" cars, and three of these four, B, C and D below, can be found at least once in Wah's communicators:
Only one version, C, has been seen so far as knobs. It has a small raised rim on the back that elevates the flange ever so slightly off of the comm's aluminum panel, creating a tiny visible gap at the base. Myth: The hubs were from Aurora's "ThunderJet" slot car line. Truth: Yes, but not originally. "Vibrators" were the first slot cars widely sold in the U.S. starting around 1961, but being plagued with problems, Aurora replaced them two years later with the "T-Jet" line which was far more robust. Those Vibe parts that could be repacked and used in T-Jets, included Type C hubs, seem to have been so. Vibrator car replacement parts were sold in envelopes; T-Jet on blister cards. We've seen these C hubs in both types of packaging (see picture below). Note - no classic flat-bottom T-Jet or aluminum hub has ever been observed on an authentic Wah comm.
|
| Alpha (hero) |
 |
Zeta (dummy) |
 |
||||||
| Crystal AB | Siam/Hyacinth 1 | Olivine AB | hole-not installed | Hyacinth 12ss | hole-not installed | ||||
| Beta (hero) |
 |
Eta (dummy) |
 |
||||||
| Emerald AB (5) 2 | Hyacinth | Crystal AB (4) 2 | Emerald AB (2) | Hyacinth (3) | Blk Diamond (1) | ||||
| Gamma (dummy) |
 |
Theta (dummy) |
 |
||||||
| Emerald AB (5) | Light Siam (4) | Siam (5) | Light Siam (5) | Hyacinth (4) | Olivine AB (3) | ||||
| Delta (dummy) |
 |
Iota (dummy) |
 |
||||||
| Emerald AB (2) | Light Siam (5) 3 | Siam | half-pearl (4) 4 | Hyacinth (5) | Fuchsia(4) 4 | ||||
| Epsilon (dummy) |
 |
Kappa (dummy) |
 |
||||||
| Blk Diamond AB | Hyacinth | Emerald AB | never installed | red cabochon (5) 5 | Emerald AB (5) |
| (1-5) = Confidence of color choice. The range goes from high certainty (5) down to a crude guess (1). "Blk Diamond" = Black Diamond 1 = screen caps show the original Alpha rhinestone to be Siam that likely fell off in Season 3. The current Hyacinth could have been taken from one of the dummies. 2 = Beta was found in 2024 to have had 16ss Aqua chatons in the left and right positions. These were installed after the prop's last appearance in the show. 3 = Delta's center stone's glass portion is now missing, having fallen off between the auction and the SciFi museum. Its mirror backing is still in place. 4 = Iota lost before late Season 2 its left jewel, probably a 4.5mm green half-pearl, as well as the entire right jewel hub, as a larger white element is seen thereafter. 5 = Kappa's center jewel is a rounded ruby "bullette" cabochon, 3mm in diameter and height, likely taken from a wristwatch crown. A transparent metallic coating called Aurora Borealis (or "AB") that Swarovski developed in 1956 creates extra colors reflecting off the outer surface. The effect is similar to an oil slick on water, adding hues off the rhinestone that aren't at all in the base glass color - complicating our guess as to the actual stone colors Wah used. We have concluded that all the various jewels seen in the ten comms can be described by twelve different types/colors as shown above. Seven of those are already right there on the five found comms, and so we simply extended those confirmed choices to their fullest logical extent in the five others as supported by visual evidence. Swarovski did not have U.S. sales until 1979, so once Wah's limited stash of stones was used up it looks as if he needed to leave some hubs blank on two of the comms (Zeta and Kappa). As for the hubs, we again see (almost entirely) the Type "C" medium flange, though the center jewel in Delta was glued to a thick-flange "D." Zeta's two outer hubs with the big holes drilled in them are a thinner-flange Type "B."
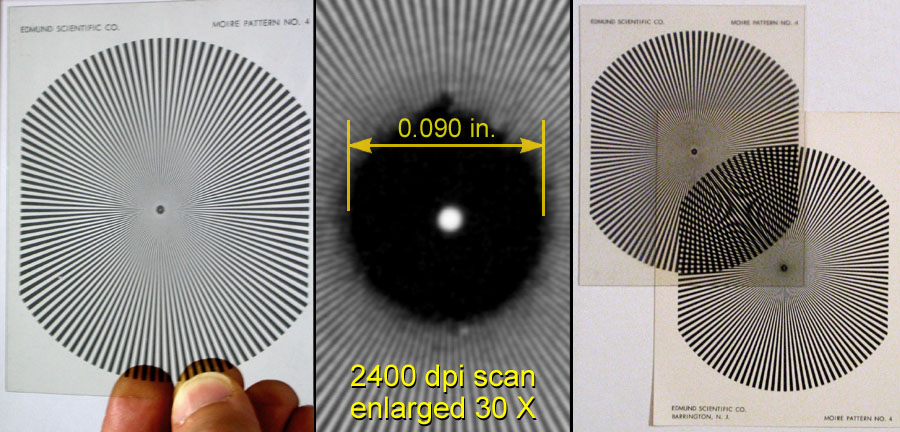
The most common image people think of for this inside detail is the "spider," created from two radial line patterns stacked together (see picture just above). This pattern, from a kit sold by Edmund Scientific Co. starting in 1965, was their fourth out of a series of nine images, and thus is referred to by the company as "Pattern #4." It is 120 evenly spaced radial lines, each exactly 1.5 degrees in arc, that originate at a 0.090" dia. black outer dot and a tiny 0.010" dia. clear inner dot that marks dead center. The lines remain completely sharp and intact all the way in; no broken edges anywhere. This clarity of the pattern's center cannot be faithfully reproduced by any standard printer or photocopier today. When one original #4 is rotated above another to create the moving spider, it is a thing of beauty.
(Note the pattern created by the overlap in the upper right photo is also the exact same as in the moiré bezel in one of the two Wah original tricorders.) As it turns out, we see a different pattern or configurations in each of the ten comms that came out of Wah's shop. These are discussed at length on: |
||
|
|
> > > > The Details - A MOIRÉ STORY < < < < |
|
| In summary, what we have found for the ten original communicators are: |
||
 |
Seen in: Alpha hero Source: Edmund's 1960's Moiré Pattern Series (A) Kit, pattern #4. Description: 2-layer moving effect from a top pattern printed on clear acetate (dot 0.005" off-center left) above an identical image on semi-gloss white Kromokote cardstock (dot 0.118" off-center). The bottom is rotated via a 30 sec. stopwatch. |
 |
Seen in: Beta hero Source: Edmund's 1960's Moiré Pattern Series (A) Kit, pattern #4. Description: 2-layer moving effect from a top pattern printed on clear acetate (dot 0.023" off-center right) above an identical image on semi-gloss white Kromokote cardstock (dot 0.008 off-centered). The bottom is rotated via a 30 sec. stopwatch. |
|||
 |
Seen in: Gamma Source: booklet "The Science of Moiré Patterns" by Gerald Oster, 1964-1966 editions, image on page 24. Sold through Edmund Scientific. Description: black ink on matte white paper. |
 |
Seen in: Delta Source: booklet "The Science of Moiré Patterns" by Gerald Oster, 1964 ed. only, cover image. Sold through Edmund Scientific. Description: black ink on matte white cardstock. |
|||
 |
Seen in: Epsilon Source: booklet "The Science of Moiré Patterns" by Gerald Oster, 1964-1966 editions, image on page 9. Sold through Edmund Scientific. Description: black ink on matte white paper. |
 |
Seen in: Zeta Source: booklet "The Science of Moiré Patterns" by Gerald Oster, 1964-1966 editions, image on page 9. Sold through Edmund Scientific. Description: black ink on matte white paper. |
|||
 |
Seen in: Eta Source: Edmund Scientific 1960's Moiré Pattern Series (B) Kit, pattern #18 (logarithmic spirals). Description: black ink on white Kromokote cardstock. |
 |
Seen in: Theta Source: Edmund Scientific 1960's Experimenter's Moiré Kit No. 70718, parabolic-lensed sheet samples. Description: Two stacked 0.009" thick clear thermoplastic 1-sided sheets with 10,000 parabolic lenses per square inch, as made by Rowlux. |
|||
 |
Seen in: Iota Source: booklet "The Science of Moiré Patterns" by Gerald Oster, 1964 ed. only, cover image. Sold through Edmund Scientific. Description: black ink on matte white cardstock. |
 |
Seen in: Kappa Source: booklet "The Science of Moiré Patterns" by Gerald Oster, 1964 edition, image on advertising insert (1). Sold through Edmund Scientific. Description: black ink on matte white paper. |
|||
|
(1) Advertising insert is exact duplicate of pages 38 & 74 from the 1965 Edmund Scientific catalog, but printed on matte stock instead of semi-gloss catalog paper. |
||||||
| With both the jewel colors and moiré patterns being so different in each comm, it's almost as if Wah intentionally set out to make them all different. It would have been easier to clip all the circles from just one image for the eight dummies' moirés, for instance. Was it his whimsical artistic side peeking out in giving each of his creations a little personality of their own? We like to think yes. The other portion of the moiré assembly is the bezel ring. We have precise data on five of them, and just like every other detail, they are all different. They were lathed from what was likely a 1-1/4" aluminum tube (not pipe). There are two distinct styles: 1) a "ledge" style used in the heroes has the transparent moiré pattern sitting on a "ledge" that is actually the top of an inner ring nestled inside the outer, and 2) the "lip" style used in the dummies where the ring has been hogged out except for the upper surface, which becomes a lip that the moiré paper can then be tucked under:
Most or all of Wah's bezel rings also had grooves cut in on the side. The quintessential number has always been assumed to be three grooves, and in fact Gamma and Zeta have that many. However Epsilon has five (or six if you count an extra tiny wisp of one) and Alpha has four. Delta with its rogue unfinished bezel; none. Of those other rings that we can see only fuzzy in the distance, two grooves seem to be the norm. The bezel ring is a nominal 3/16" high. |
||
|
|
Time for a brief message to the little bit of Devil within us all... |
|
| Now that you know the real details inside authentic comms, a small part of you might be tempted to take your cool replica and spruce it up in the hopes of maybe passing it off as genuine. Don't go there! No replica has ever duplicated even most, yet alone ALL, of the countless (and some unreported here) tiny features that make a Wah original. By all means goose yours up to bring it closer to true. That's what we're all about. But you'll never get it past any real expert. Word to the wise. Back to our regular programming... |
||
|
Wrapping up this overview page; the total weight of dummy comms (as measured by Epsilon and Zeta) is only 41 grams (1.5 ounces). HC Note July 09 - this weight (highlighted in yellow), which was recalled after a brief one-time measurement, is likely incorrect; being too light. The Alpha hero was carefully measured to be exactly 116 grams (4.1 ounces). |
||
| Star Trek is a Registered and Copyrighted Trademark of Paramount Pictures. All Rights Reserved. All subject matters referring to Star Trek are trademarks of Paramount Pictures. This website has not been produced or endorsed by Paramount Pictures. Any material belonging to Paramount’s Copyrighted Material that may appear on this site complies with fair and/or acceptable use for the purposes of review, study, criticism, or news reporting. |


 Wah
started the classic communicator props with top and bottom shell halves
made of 0.06" thick vacu-formed black Kydex, a durable, lightly
textured semi-gloss plastic introduced just the year prior.
Wah
started the classic communicator props with top and bottom shell halves
made of 0.06" thick vacu-formed black Kydex, a durable, lightly
textured semi-gloss plastic introduced just the year prior. 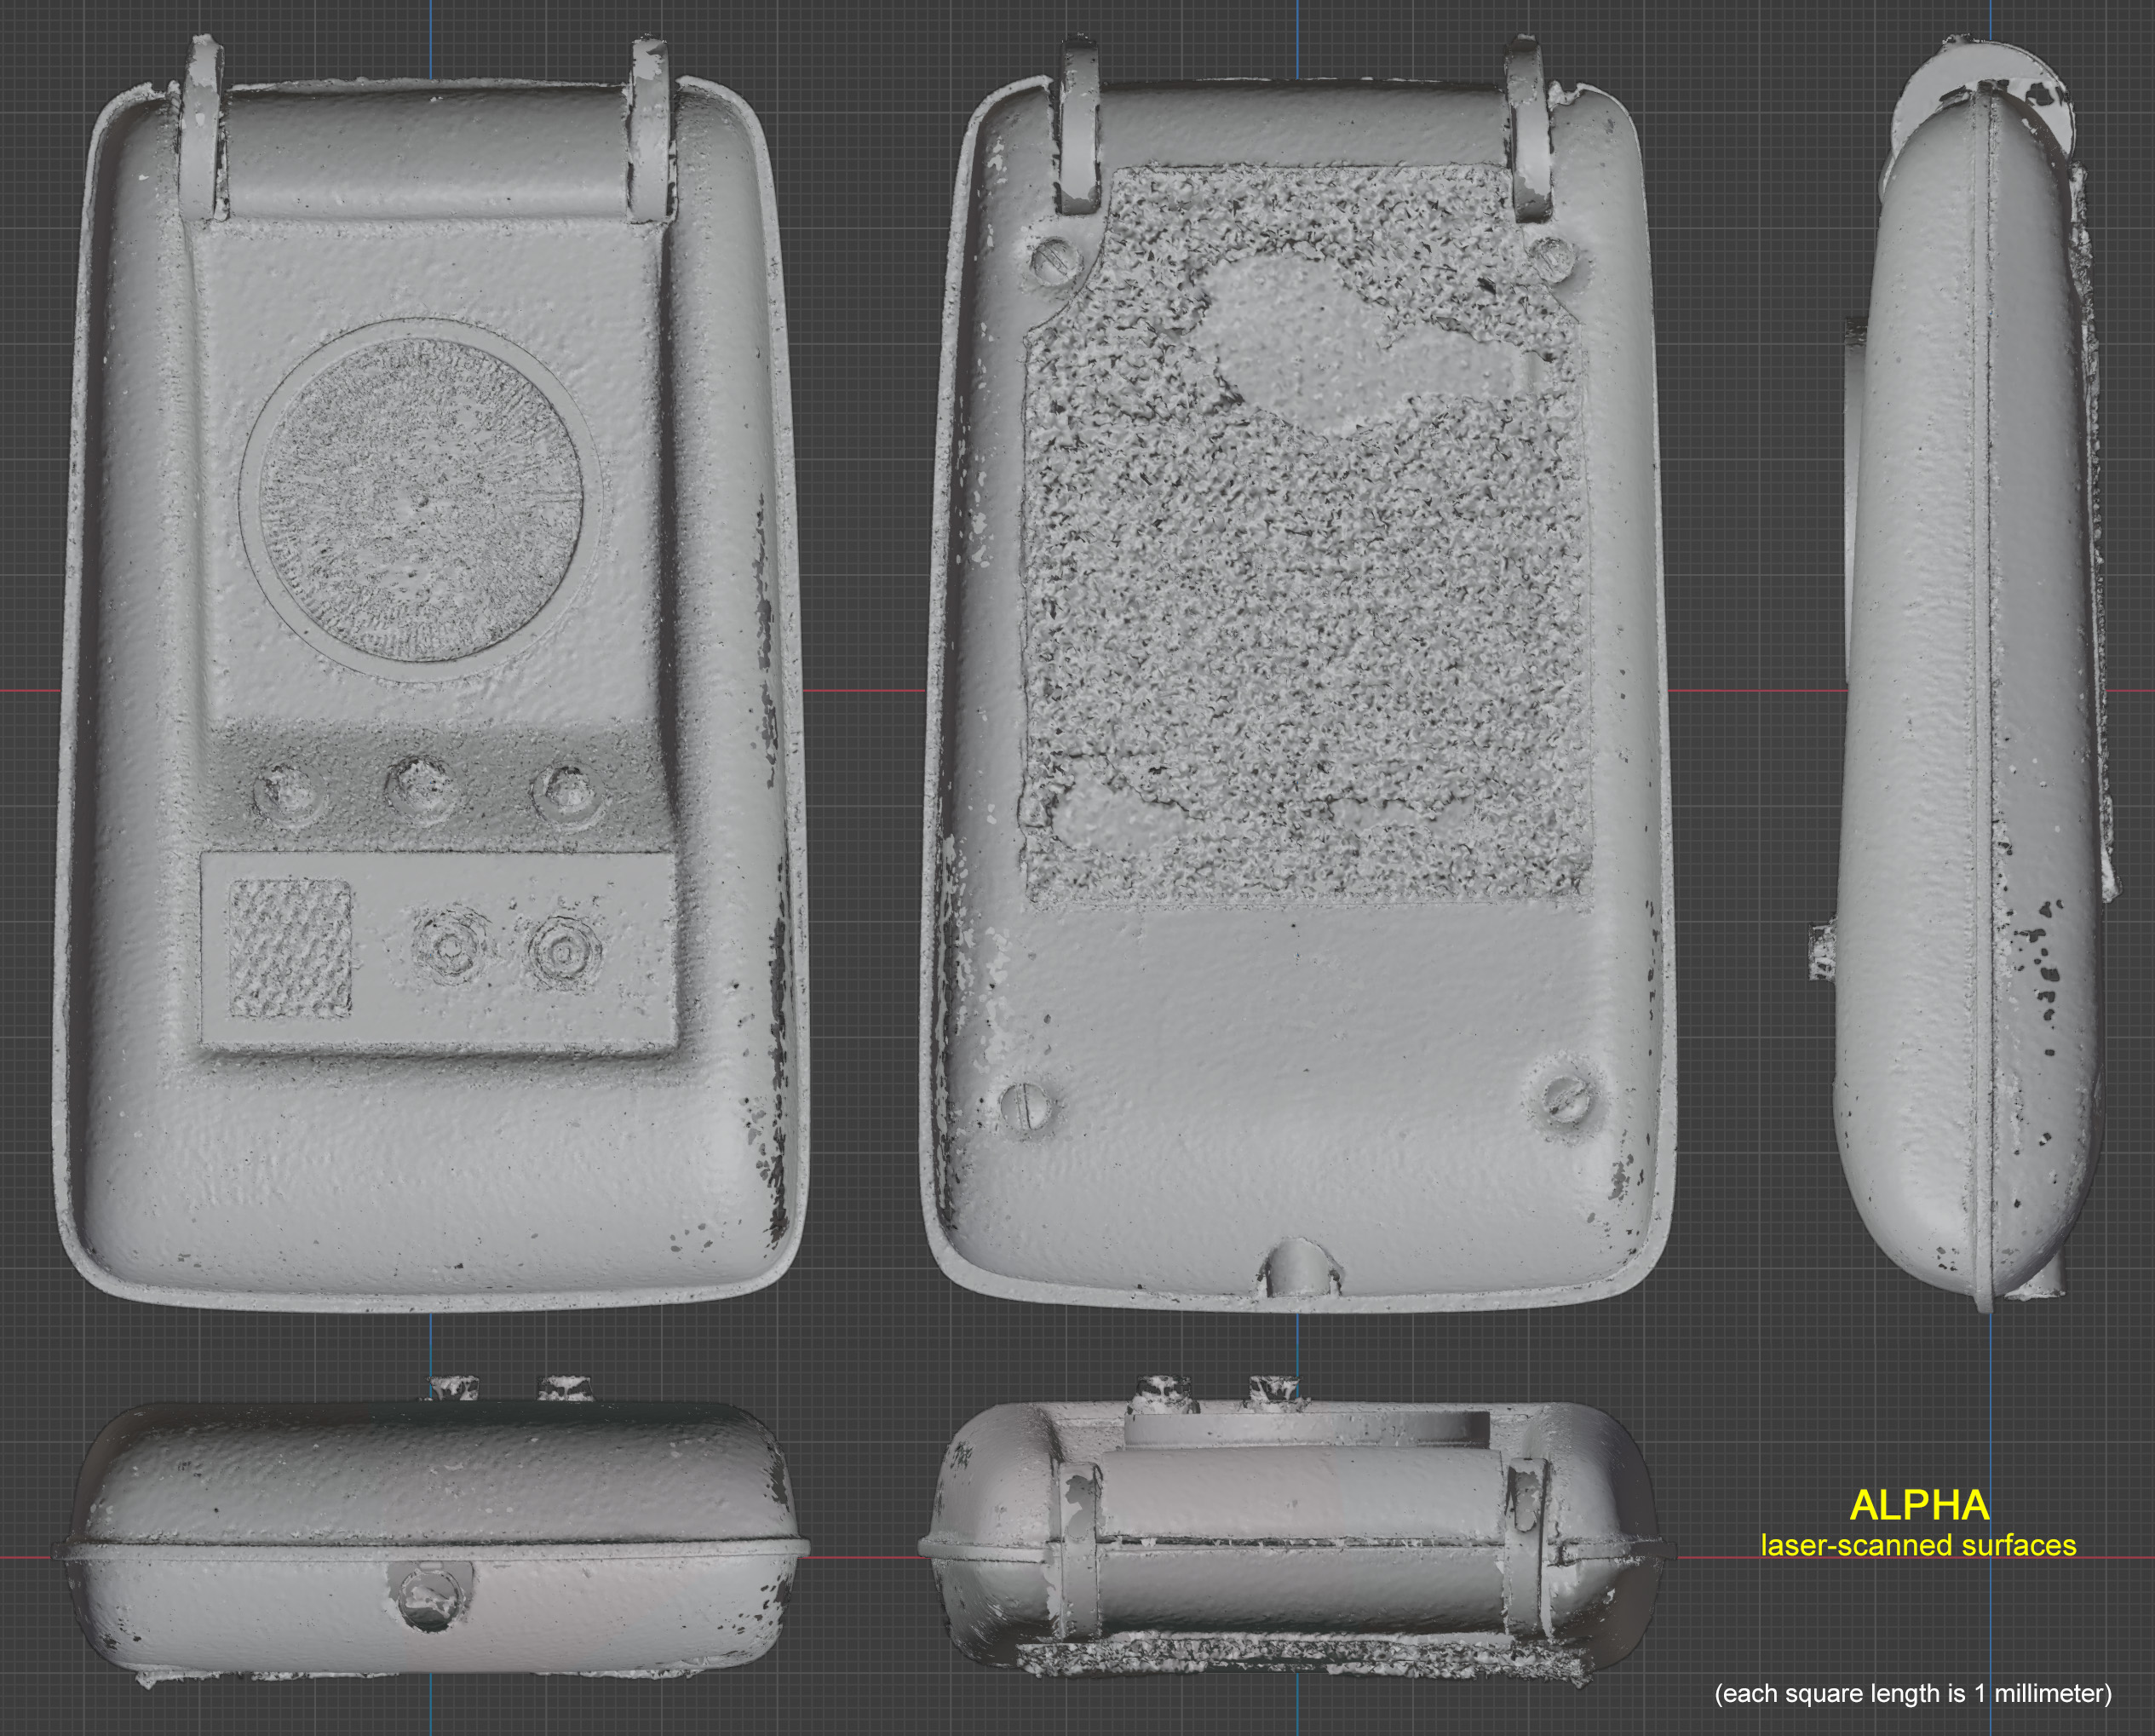
 The
two shell halves were joined at a 1/16" thick aluminum midplate
cut to extend on average about 1/16" beyond the shell. All
of the upper shell halves, and half (5 out of 10) of the bottoms, were
glued to the midplate. The three comms we've seen the insides
of;
The
two shell halves were joined at a 1/16" thick aluminum midplate
cut to extend on average about 1/16" beyond the shell. All
of the upper shell halves, and half (5 out of 10) of the bottoms, were
glued to the midplate. The three comms we've seen the insides
of; 
 The
antenna, or swinging top, is a nominal 0.027" thick perforated
brass with 5/64" holes spaced 8 per inch in staggered rows.
To give rigidity to the element that the clear-based pilot communicators
didn't have, the four sides were bent. The sheets were likely
bent by hand (not pressed in a form, since they were all different)
after being cut to size. A 1/16" wire, usually brass, was
soldered none too cleanly onto the bent sheet, and then the wire was
inserted into two 1/8" wide brass disc hinge wheels cut from a
5/8" diameter rod. These discs also had a hole in the center.
To finish the assembly, a 1/8" dia. rod was inserted as an axle
through the disc's holes and the rod was glued to the top shell half
with a glob of grey plumber's epoxy.
The
antenna, or swinging top, is a nominal 0.027" thick perforated
brass with 5/64" holes spaced 8 per inch in staggered rows.
To give rigidity to the element that the clear-based pilot communicators
didn't have, the four sides were bent. The sheets were likely
bent by hand (not pressed in a form, since they were all different)
after being cut to size. A 1/16" wire, usually brass, was
soldered none too cleanly onto the bent sheet, and then the wire was
inserted into two 1/8" wide brass disc hinge wheels cut from a
5/8" diameter rod. These discs also had a hole in the center.
To finish the assembly, a 1/8" dia. rod was inserted as an axle
through the disc's holes and the rod was glued to the top shell half
with a glob of grey plumber's epoxy.


 Screws
are seen in five comms:
Screws
are seen in five comms:  All
ten communicators had a 1.75" to 2" wide piece of black Velcro
of varying length on the bottom. Since the belts and later the
trousers themselves had the soft fuzzy side sewn on, the attachable
props such as the communicator and phasers got the stiff bristly hook
surface.
All
ten communicators had a 1.75" to 2" wide piece of black Velcro
of varying length on the bottom. Since the belts and later the
trousers themselves had the soft fuzzy side sewn on, the attachable
props such as the communicator and phasers got the stiff bristly hook
surface.
 A
thin aluminum plate had on it two features: the "microphone
grill" and the control knobs. The squarish mic-grill cutout
was backed by a piece of early-1960s transistor radio speaker mesh,
very pale gold in color, which came with rows of tiny holes and a diamond
pattern embossed on its surface. Given the small size needed per
prop (about 1/2" square, plus .75" sq. in each of Wah's two
tricorders), Wah would have needed the mesh from only one radio for
everything.
A
thin aluminum plate had on it two features: the "microphone
grill" and the control knobs. The squarish mic-grill cutout
was backed by a piece of early-1960s transistor radio speaker mesh,
very pale gold in color, which came with rows of tiny holes and a diamond
pattern embossed on its surface. Given the small size needed per
prop (about 1/2" square, plus .75" sq. in each of Wah's two
tricorders), Wah would have needed the mesh from only one radio for
everything.


 Swarovski
glass flatback rhinestones (with a mirrored coating on the back) were
mostly used as the three "indicator lights" and were glued
onto the same "C" Vibe hubs as the knobs, but inverted and
recessed into the shell. These rhinestone "jewels" in
both 16ss and 20ss ("stone size"), 4.0mm and 4.8mm diameter
respectively (12ss at 3.2mm is seen in
Swarovski
glass flatback rhinestones (with a mirrored coating on the back) were
mostly used as the three "indicator lights" and were glued
onto the same "C" Vibe hubs as the knobs, but inverted and
recessed into the shell. These rhinestone "jewels" in
both 16ss and 20ss ("stone size"), 4.0mm and 4.8mm diameter
respectively (12ss at 3.2mm is seen in  A
moiré pattern (pronounced "mwah-RAY") is the unexpected swirl
of arcs and lines formed when two similar images (the top one transparent)
are overlaid and offset. The comm's large round feature (that
had an unknown function on the show, but it could be construed by some
to maybe be a speaker) had such a moiré pattern, or something similar,
inset into a short length of machined aluminum tube called the bezel
ring. The bezel ring has either a little lip or a ledge at the
top to catch and hold the printed paper or plastic moiré image.
A
moiré pattern (pronounced "mwah-RAY") is the unexpected swirl
of arcs and lines formed when two similar images (the top one transparent)
are overlaid and offset. The comm's large round feature (that
had an unknown function on the show, but it could be construed by some
to maybe be a speaker) had such a moiré pattern, or something similar,
inset into a short length of machined aluminum tube called the bezel
ring. The bezel ring has either a little lip or a ledge at the
top to catch and hold the printed paper or plastic moiré image.